Installation
Prepare a Raspberry Pi (RPi) to read a DHT22 (digital humidity and temperature sensor) and post values as an EPICS IOC server.
- Initial configuration of the RPi
- Installation of required libraries
- Installation of the project code
- Run the project
Initial Configuration
There are several steps to configure a new RaspberryPi for use. We’ll follow (more or less) this guide from Adafruit: https://learn.adafruit.com/circuitpython-on-raspberrypi-linux/installing-circuitpython-on-raspberry-pi
- Parts list
- Connect a DHT22 sensor to the RPi
- Prepare the Operating System media
- Boot the RPi
- Pick a unique host name
raspi-config- Apply Operating system updates
- Enable the hardware interfaces used by this project
- Make Python v3 be the default
python - Reboot
Connect the DHT22 sensor
If needed, solder a single-row, 6-pin socket header to the RPi board, covering GPIO pins 1,3,5,7,9,11
Press a single-row, 5-pin strip of right-angle header pins into the sockets for pins 1,3,5,7,9, as shown in the next two photos.
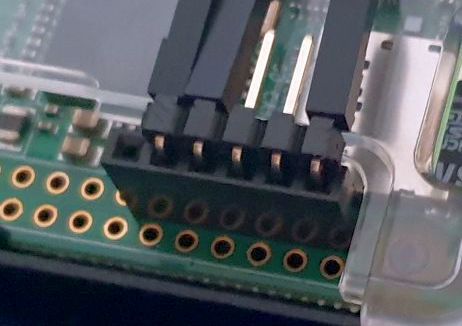
Right-angle header pins in 6-socket header soldered to RPi Zero W board.

Right-angle header pins in full socket header soldered to RPi Zero W board.
connect the 3 pins of the DHT22 as follows:
DHT22 pin GPIO pin meaning +1 3v3 Power (+3.3 VDC) out7 GPIO 4 (Pin 4, to match the software) -9 Ground
Prepare the Operating System media
- OS Media choice: micro SD card, 4 GB (larger is not needed for this project but works fine, takes longer to flash AND backup, takes more space to backup)
- flash a new Raspberry Pi OS Lite onto a micro SD card (Balena Etcher recommended)
- enable SSH login: create empty
sshfile on boot partition - configure WiFi: create
wpa_supplicant.conffile on boot partition per https://desertbot.io/blog/headless-raspberry-pi-4-ssh-wifi-setup - Make Python v3 be the default python (python v2 is EOL starting 2020).
Boot the RPi
- install micro SD card in RPi and apply power
- identify new RPi IP number on your subnet and login:
ssh pi@new.I.P.number - password is
raspberryuntil you change it (highly recommended)
Pick a unique host name
If you plan on having more than one RPi on your local subnet, then you
should give a unique to each and every one of them. You can be
creative, or mundane. Here, we name our pi based on its Serial number
(from /proc/cpuinfo). We’ll start with rpi (to make the host
name recognizable), then pick the last four characters of the serial
number, expecting that to make a unique name:
# Suggested host name:
echo rpi$(cat /proc/cpuinfo  | grep Serial | tail -c 5)
Use this name in raspi-config below.
raspi-config
Run sudo raspi-config and configure these settings:
- 1 change password for user
pi - 2 Network Options: N1 Hostname – pick a unique name, see suggestion above
- 4 Localisation Options: I2 Change Timezone – (if not set in
wpa_supplicant.conffile) - 5 Interfacing Options: P4 SPI – Yes
- 5 Interfacing Options: P5 I2C – Yes
- 5 Interfacing Options: P8 Remote GPIO – No
- 8 Update – select it
You may be prompted to reboot now. Probably best to reboot if you changed the hostname.
In different versions of RaspberryPi OS and raspi-config, these
settings may be moved to other submenus. You might have to hunt for
them.
Apply Operating system updates
Update the operating system with latest changes, patches, and security items. This command only runs the install if the first command (identify the packages with available upgrades) succeeds:
sudo apt-get update && sudo apt-get upgrade -y
This step could take some time (5-60 or more), depending on how many updates have been released since your download of the OS image was released.
Make Python v3 be the default python
By default, python v2 is what you get when you type python. Since
python v2 reached the end-of-life after 2019, we want python3 to be
called when we type python. Here’s how to make that happen:
# make python3 the default python
sudo apt-get install -y python3 git python3-pip
sudo pip3 install --upgrade setuptools
sudo update-alternatives --install /usr/bin/python python $(which python2) 1
sudo update-alternatives --install /usr/bin/python python $(which python3) 2
sudo update-alternatives --config python
Installation of required libraries
Enable the _I2C_ and _SPI_ interfaces:
sudo apt-get install -y python3-smbus i2c-tools
This command will show any I2C or SPI devices in the system:
ls -l /dev/{i2c,spi}*
Any i2c-connected devices will report their address here:
sudo i2cdetect -y 1
# install python modules to support our Python code
# need module adafruit_dht
# https://learn.adafruit.com/circuitpython-on-raspberrypi-linux/installing-circuitpython-on-raspberry-pi
pip3 install RPI.GPIO adafruit-blinka adafruit-circuitpython-dht
sudo apt-get install -y libgpiod2

# need module caproto
pip3 install caproto  --no-warn-script-location

# to run EPICS IOC in a detached shell
sudo apt-get install -y screen
Installation of the project code
mkdir ~/Documents
cd ~/Documents
git clone https://github.com/prjemian/dhtioc
cd dhtioc/
pip3 install -e .
chmod +x dhtioc/dhtioc_manage.sh
pushd ${HOME}/.local/bin
ln -s ${HOME}/Documents/dhtioc/dhtioc/dhtioc_manage.sh ./
Run the IOC : command line
dhtioc -h
dhtioc --list-pvs --prefix ${HOSTNAME}:
Run the IOC : automatically
With a bash shell script, the dhtioc program can be started or
stopped. When this script is added as a periodic cron task, the
program will start automatically if it has stopped.
pi@rpi170f:~/Documents/dhtioc $ dhtioc_manage.sh
Usage: dhtioc_manage.sh {start|stop|restart|status|checkup|console|run}

    COMMANDS
        console   attach to IOC console if IOC is running in screen
        checkup   check that IOC is running, restart if not
        restart   restart IOC
        run       run IOC in console (not screen)
        start     start IOC
        status    report if IOC is running
        stop      stop IOC
- start the IOC:
dhtioc_manage.sh start - stop the IOC:
dhtioc_manage.sh stop - restart the IOC:
dhtioc_manage.sh restart - is the IOC running:
dhtioc_manage.sh status - start IOC if not running:
dhtioc_manage.sh checkup
Add checkup and restart to periodic tasks
The cron program runs periodic tasks. It is flexible to configure.
The following first line is the configuration to run the checkup every two
minutes (*/2). Any output (both print and error) will be discarded.
Sometimes, the dhtioc will stop logging temperature, such as shown in the next chart. Until the source of that is resolved, the second line below will restart the IOC at 3 minutes past the hour, every hour of every day.
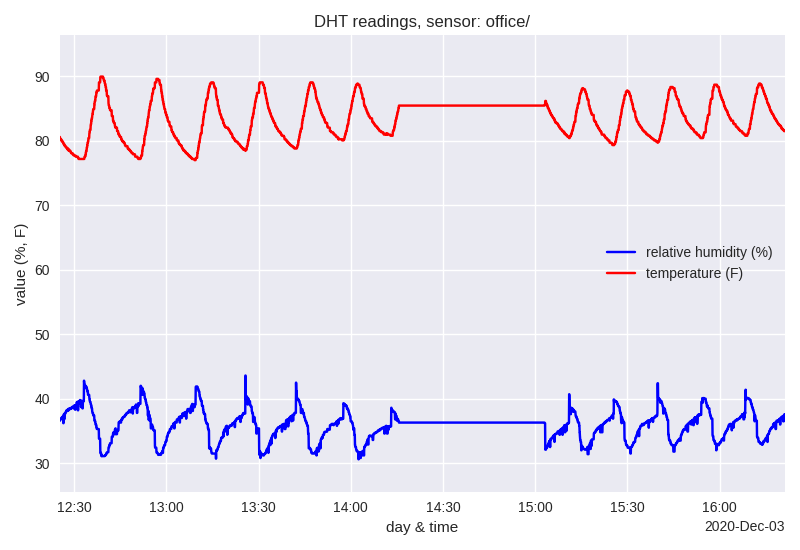
The IOC stalled ~2:15 pm, then restarted at 3:03 pm via cron task.
*/2 * * * * /home/pi/.local/bin/dhtioc_manage.sh checkup 2>&1 > /dev/null
3 * * * * /home/pi/.local/bin/dhtioc_manage.sh restart 2>&1 > /dev/null
Add these lines to the list of periodic tasks using an editor (you’ll be
asked which editor, pick nano if you aren’t sure which):
crontab -e
Scroll to the bottom of the file and enter the line above on a new line. Save the file and exit the editor. Within a couple minutes, the IOC should start automatically.
Look for the data log files
Once the IOC is running and has started collecting valid readings from the DHT22 sensor, there should be log files under ~/Documents/dhtioc_raw/ based on the year, month, and day. A new log file will be written each day (so no file get more than about 1 MB). These are text files with whitespace as separator between columns.
EXAMPLE
1 2 3 4 5 6 7 8 9 10 11 12 13 14 15 16 17 18 19 20 | # file: /home/pi/Documents/dhtioc_raw/2020/12/2020-12-05.txt
# created: 2020-12-05 00:00:00.126145
# program: dhtioc
# version: 1.1.1+1.gcd2796d
# URL: https://dhtioc.readthedocs.io/
#
# IOC prefix: rpidec7:
#
# time: python timestamp (``time.time()``), seconds (since 1970-01-01T00:00:00 UTC)
# RH: relative humidity, %
# T: temperature, C
#
# time RH T
1607148000.12 43.0 22.5
1607148002.13 43.0 22.5
1607148004.13 43.0 22.5
1607148006.12 42.9 22.5
1607148008.13 42.9 22.5
1607148010.13 42.9 22.5
1607148012.12 42.9 22.5
|